Motion Blur
Motion blur is the artefact by which fast-moving objects appear blurred. It's been present in movies, photographs and video games for many years now. I haven't seen it used in any real-world user interfaces yet, though some designers have utilized it in prototypes, for example YW_Z in his Pocket animation:
I'm not sure I'd like to see this effect used in every animation, but I think it could bring more life-like look to some interactions. That's why I decided to take a stab at creating it with Cocoa Touch. The article is divided into two parts. First, I'll discuss applying motion blur effect to still images; then I'll show how to use it with the UIView.
Motion Blur Filter
Many developers had trouble using Gaussian blur as an overlay when iOS 7 first came out.
It was kind of unintuitive — you had to snapshot a view, apply a filter to the image and then add this image to the view hierarchy, for example with the UIImageView.
It's gotten better in iOS 8, thanks to UIVisualEffectView. Unfortunately, creating custom UIVisualEffect subclasses isn't documented, so I had to use the old-fashioned way to create the motion blur effect.
It took me three attempts to get a filter working:
- I thought about using Core Image's
CIMotionBlurfilter, but unfortunately it isn't available on iOS. - I tried using GPUImage library (it uses OpenGL under the hood), but I stumbled on the issue with transparent images. GPUImage has a large codebase and I don't have much experience with OpenGL Shading Language, so I haven't tried fixing this issue.
- Finally, while browsing through iOS 8 Release Notes I noticed that Apple added ability to use custom image kernels on iOS and that's the approach I pursued.
WWDC videos are always a good way to learn the basics of frameworks, so I started by watching sessions 514 – Advances in Core Image and 515 – Developing Core Image Filters for iOS from WWDC 2014. To my surprise, one of the presenters of session 515 showed how to write a motion blur filter. Let's see how it works.
Kernel
Processing code of Core Image filters is written in Core Image Kernel Language. On a high-level, a kernel routine maps a source pixel to a destination pixel (pixel values are RGBA colors). The routine is called once for each pixel. Core Image parallelizes this process, such that GPU is properly utilized. I'll try to succinctly describe how the motionBlur routine works, so you won't have to go and watch those two sessions right now. The routine consists of only a few lines of code:
kernel vec4 motionBlur(sampler image, vec2 velocity, float numSamplesInput) {// 1

  int numSamples = int(floor(numSamplesInput));
  vec4 sum = vec4(0.0), avg = vec4(0.0);
  vec2 dc = destCoord(), offset = -velocity;                                 // 2

  for (int i=0; i < (numSamples * 2 + 1); i++) {                             // 3
      sum += sample (image, samplerTransform (image, dc + offset));
      offset += velocity / float(numSamples);
  }

  avg = sum / float((numSamples * 2 + 1));                                   // 4
  return avg;
}
Here's what the code does:
motionBlurtakes three parameters and returns a vector:imageis asamplerobjectvelocityis a vector containing two floating-point values, it represents the direction in which the blur is going to be appliednumSamplesInputis a number of samples; it's really an integer, but unfortunately integers can't be used as input parameters to kernel routines- the return value is a 4-dimensional vector representing an RGBA color
- The
destCoord()routine returns the position of the pixel currently being computed. - Takes
numSamplesalong the-velocityvector, one sample fromdcandnumSamplesalong thevelocityvector. Sums the pixels usingsumvariable. - Calculates an arithmetic mean of the pixels,
avg, and returns it.
The best way to learn a new concept is often by looking at an example. So, let's assume we have a 1x9px image, velocity equals (0, 4), numSamplesInput equals 2 and dc (the pixel being computed) is located at the position (0, 4). In consecutive iterations samples will be taken from the coordinates denoted by i with values in the interval [0, 4], summed and then divided by 2 * numSamples + 1 = 5, as shown on the image:
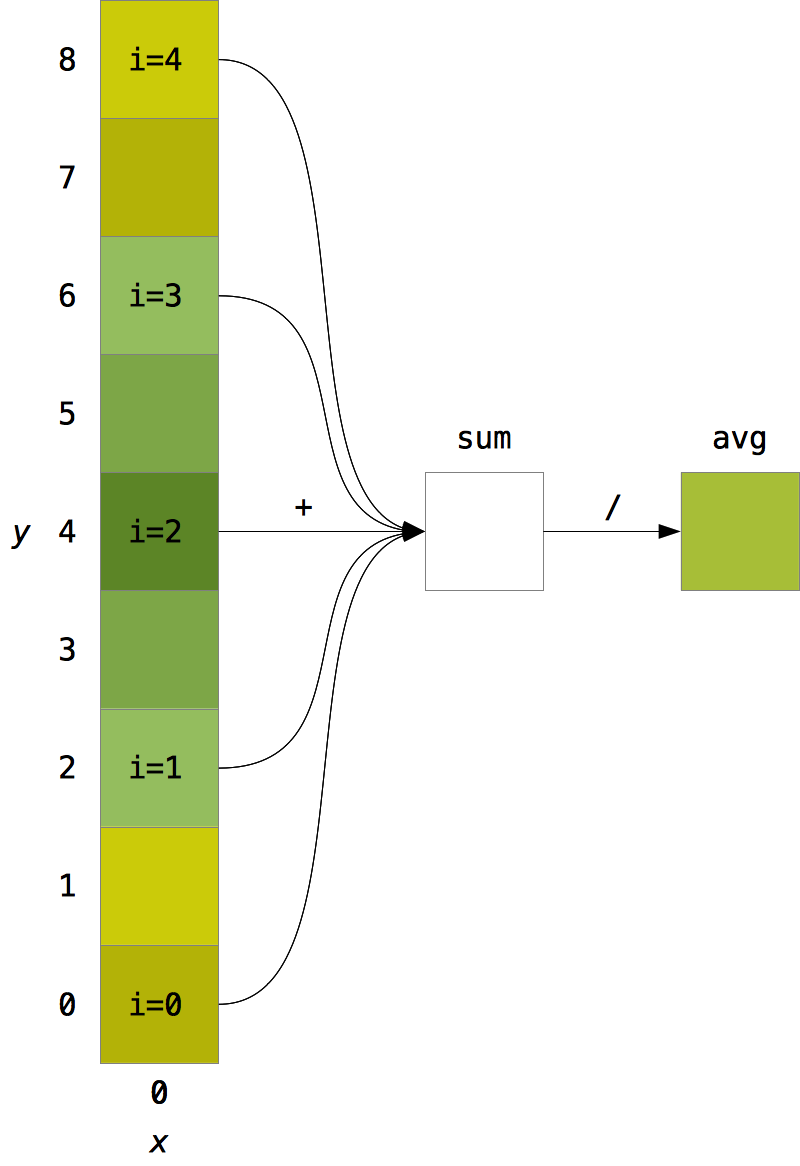
sum is an intermediary value.CIFilter subclass
To be able to use the kernel from within an iOS app it has to have a corresponding CIFilter subclass. I named mine MotionBlurFilter and declared it as follows:
// MotionBlurFilter.h

#import <CoreImage/CoreImage.h>

@interface MotionBlurFilter : CIFilter

@property (strong, nonatomic) CIImage *inputImage;
@property (strong, nonatomic) NSNumber *inputRadius;
@property (strong, nonatomic) NSNumber *inputAngle;
@property (strong, nonatomic) NSNumber *numSamples;

@end

// MotionBlurFilter.m

CGRect regionOf(CGRect rect, CIVector *velocity)
{
    return CGRectInset(rect, -abs(velocity.X), -abs(velocity.Y));
}

@implementation MotionBlurFilter

- (CIKernel *)myKernel
{
    static CIKernel *kernel = nil;

    static dispatch_once_t onceToken;
    dispatch_once(&onceToken, ^{
        kernel = [CIKernel kernelWithString:kKernelSource];
    });

    return kernel;
}

- (void)setDefaults
{
    [super setDefaults];

    self.inputRadius = @(40);
    self.inputAngle = @(M_PI_2);
    self.numSamples = @(5);
}

- (CIImage *)outputImage
{
    float r = self.inputRadius.floatValue;
    float a = self.inputAngle.floatValue;
    CIVector *velocity = [CIVector vectorWithX:r*cos(a) Y:r*sin(a)];
    CGRect dod = regionOf(self.inputImage.extent, velocity);

    return [[self myKernel] applyWithExtent:dod
                                roiCallback:^CGRect(int index, CGRect rect) {
                                    return regionOf(rect, velocity);
                                } arguments: @[self.inputImage, velocity, self.numSamples]];
}
The regionOf() function returns an extended size of the rect after the blur has been applied1. Why is it larger? Because the edges of an image are blurred too, it's easy to notice this on the example:
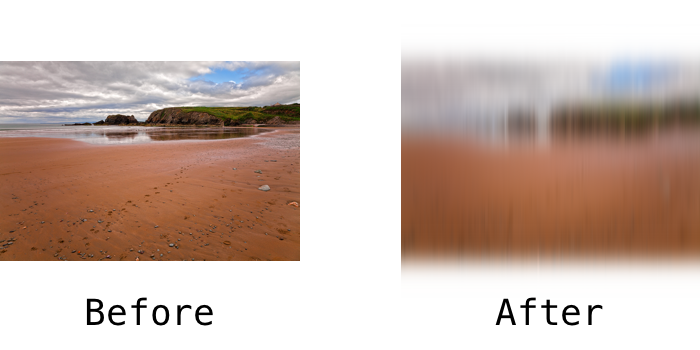
Photo by Nicolas Raymond (CC BY 3.0).
myKernel method returns a CIKernel object, setDefaults … sets the default values, outputImage returns the CIImage instance with the associated filter. Even though the method is named -applyWithExtent:roiCallback:arguments:, the actual computation happens only when CIImage object is rendered, for example using -createCGImage:fromRect:.
Applying Motion Blur to Animations
Before thinking about API design, I performed some quick benchmarks on my iPad 3 running iOS 8 beta 3 (so, rather a slow device):
Size of a view in points    Time to take a snapshot and apply the filter to it
319x281                     0.67s
640x560                     0.93s
It was obvious that I couldn't snapshot the view and apply the filter on the fly during animations. It meant that I had to cheat. I decided to snapshot the view before the animation, apply the blur to the image, add the image to the layer's hierarchy, and adjust its opacity during animations. To streamline the process I focused on applying the blur only during changes of position.
My first thought was to just put a blurring code in the CALayer subclass, because it would be easy to monitor animations added to the layer from within it.
The API wouldn't be comfortable to use, though, because the user would have to subclass the UIView to override +layerClass to return this class. Finally I went with a category on UIView with two methods:
@interface UIView (MotionBlur)

- (void)enableBlurWithAngle:(CGFloat)angle completion:(void (^)(void))completionBlock;
- (void)disableBlur;

@end
The category uses three properties, which are backed by Associated Objects (Swift extensions didn't have this ability yet, so I went with Objective-C):
@interface UIView (MotionBlurProperties)

@property (weak, nonatomic) CALayer *blurLayer;
@property (weak, nonatomic) CADisplayLink *displayLink;
// CGPoint boxed in NSValue.
@property (nonatomic) NSValue *lastPosition;

@end
enableBlurWithAngle:completion: is defined as:
- (void)enableBlurWithAngle:(CGFloat)angle completion:(void (^)(void))completionBlock
{
    // snapshot has to be performed on the main thread
    UIImage *snapshotImage = [self layerSnapshot]; // 1

    dispatch_async(dispatch_get_global_queue(DISPATCH_QUEUE_PRIORITY_DEFAULT, 0), ^{

        CGImageRef blurredImgRef = CGImageCreateByApplyingMotionBlur(snapshotImage, angle); // 2

        dispatch_async(dispatch_get_main_queue(), ^{
            [self disableBlur];

            CALayer *blurLayer = [[CALayer alloc] init]; // 3
            blurLayer.contents = (__bridge id)(blurredImgRef);
            blurLayer.opacity = 0.0f;

            CGFloat scale = [UIScreen mainScreen].scale;
            // Difference in size between the blurred image and the view.
            CGSize difference = CGSizeMake(CGImageGetWidth(blurredImgRef) / scale - CGRectGetWidth(self.frame), CGImageGetHeight(blurredImgRef) / scale - CGRectGetHeight(self.frame));
            blurLayer.frame = CGRectInset(self.bounds, -difference.width / 2, -difference.height / 2);

            blurLayer.actions = @{ @"opacity" : [NSNull null] };
            [self.layer addSublayer:blurLayer];
            self.blurLayer = blurLayer;

            CADisplayLink *displayLink = [CADisplayLink displayLinkWithTarget:self selector:@selector(tick:)]; // 4
            [displayLink addToRunLoop:[NSRunLoop mainRunLoop] forMode:NSDefaultRunLoopMode];
            self.displayLink = displayLink;

            CGImageRelease(blurredImgRef);

            if (completionBlock) {
                completionBlock();
            }
        });
    });
}
and here's what it does:
- Takes a snapshot of the view (on the main queue).
- Applies the motion blur filter (on a background queue).
- Creates a new layer (
blurLayer) containing the image and adds it to the backing layer's hierarchy. - Creates a
CADisplayLinkinstance and adds it to the main run loop.
CGImageCreateByApplyingMotionBlur() and -layerSnapshot do what their names indicate, so I'll skip their sources here. On each frame -tick: method is called:
- (void)tick:(CADisplayLink *)displayLink
{
    CGPoint realPosition = ((CALayer *)self.layer.presentationLayer).position;
    CGPoint lastPosition = [self.lastPosition CGPointValue];

    if (self.lastPosition) {
        CGFloat dx = abs(realPosition.x - lastPosition.x);
        CGFloat dy = abs(realPosition.y - lastPosition.y);
        CGFloat delta = sqrt(pow(dx, 2) + pow(dy, 2));

        // A rough approximation of a good looking blur. The larger the speed, the larger the opacity of the blur layer.
        CGFloat unboundedOpacity = log2(delta) / 5.0f;
        CGFloat opacity = fmax(fmin(unboundedOpacity, 1.0), 0.0);
        self.blurLayer.opacity = opacity;
    }

    self.lastPosition = [NSValue valueWithCGPoint:realPosition];
}
It grabs the current position from the presentation layer, calculates the difference in position between the current and the previous frame, and based on that sets blurLayer's opacity. At first, I tried to make opacity be a result of a linear function dependent on delta, but it didn't look good. After some tinkering, I went with a logarithm of delta.
Caveats
There are some caveats to this approach:
- You have to manually enable and disable the blur before and after an animation; you also have to pass a correct angle value.
- Display link will run indefinitely if not stopped manually.
- Only change of
positionis motion blurred. - Animating other properties concurrently could cause unwanted behavior.
Some of these issues could be easily fixed. For example to fix 4., we could inspect an array returned from animationKeys to see if only position is being animated.
Conclusion and Demo
Simultaneously with writing the core code I was creating a sample project based on Dribbble's prototype. You can see it in action on the video below. You can also check out the full code on GitHub here. Let me know on Twitter or by email if you liked this post or if you have any questions or suggestions.
-
This function is used in the computations of ROI (Region of Interest) and DOD (Domain of Definition). You can learn more about these topics in Core Image Programming Guide. ↩